zyj's Blog

  • 首页

  • 标签

  • 分类

  • 归档

  • 搜索

祝福kd

发表于 2019-06-17 | 分类于 kd | 评论数:


hexo部署algolia搜索

发表于 2019-06-04 | 更新于 2019-06-12 | 分类于 hexo | 评论数:
注册algolia

algolia官网

可以使用github 和谷歌账号 直接登录(直接跳过新手引导)

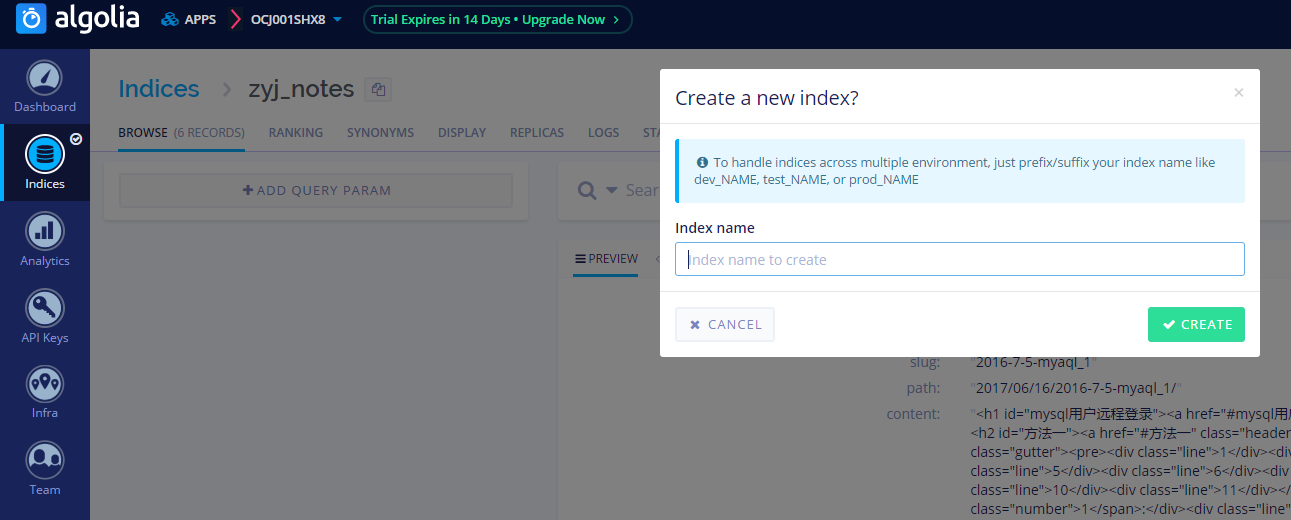
新建index

新建index

阅读全文 »

hexo部署github pages

发表于 2019-06-04 | 分类于 hexo | 评论数:
注册github

这里不多做解释,附上github地址:github

创建github page 仓库

建个github库。名字必须是 yourname.github.io

yourname 就是你的github的用户名 例如:zhouyajun.github.io

阅读全文 »

hexo+github+hexo-theam-next个人博客

发表于 2019-06-04 | 分类于 hexo | 评论数:
源码下载
1
2
git clone git@git.oschina.net:yajun0310/blog.git
git clone https://git.oschina.net/yajun0310/blog.git
安装npm依赖module
1
cd blog
1
npm install
阅读全文 »

apidoc详解

发表于 2019-06-04 | 分类于 api | 评论数:

ApiDoc使用详解

参考项目文档:apidoc官方文档

1. 安装apidoc

注意:首先要安装npm网上搜索
安装命令:npm install apidoc -g

2.安装grunt module
npm install grunt-apidoc --save-dev

3.配置apidoc.json或者package.json文件

1
2
3
4
5
6
7
8
9
10
11
12
13
14
15
16
17
18
19
20
21
22
23
24
25
{
"name": "项目名称",
"version": "版本号",
"description": "项目描述",
"title":"浏览器网页标题",
"url":"请求的路径前面的服务器地址",
"sampleUrl":"模拟请求的地址"(如果设置,所有接口都会有个模拟请求的界面),
"header": {//没试过
"title": "My own header title",
"filename": "header.md"
},
"footer": {
"title": "My own footer title",
"filename": "footer.md"
},
"order":{
//排序,没试过
},
"template":{
"forceLanguage":"zh_cn",//语言
"withCompare":true //是否开启比较版本功能(默认true),
"withGenerator":true //是否开启生成信息在页脚(默认true),
"jQueryAjaxSetup":object //ajax请求(未尝试)
}
}

4.apidoc接口文档参数详解

  • @api {method} /path/to/:uid [title]

    注:定义接口名,请求方式,路径(必填,除了apiDefine)

    1
    2
    3
    /**
    * @api {post} /user/reg 用户注册
    */
  • @apiDefine name [title]

    注:定义公共文档块,可使用apiUse在其他文档中插入

    1
    2
    3
    4
    5
    6
    7
    8
    9
    /**
    * @apiDefine MyError
    * @apiError UserNotFound The <code>id</code> of the User was not found.
    */

    /**
    * @api {get} /user/:id
    * @apiUse MyError
    */
  • @apiDescription text

    注:接口描述

    1
    2
    3
    /**
    *@apiDescription 用户登录接口
    */
  • @apiName name

    注:接口名(必填,用户文档左侧菜单二级分类)

    1
    2
    3
    /**
    *@apiName login
    */
  • @apiGroup group

    注:接口分组(必填,用户文档左侧菜单一级分类)

    1
    2
    3
    /**
    *@apiGroup user
    */
  • @apiVersion 1.1.1

    注:接口版本号(必须是:major.minor.patch格式:1.0.0)

    1
    2
    3
    /**
    *@apiVersion 1.0.0
    */
  • @apiDeprecated text

    注:未测试

    1
    2
    3
    /**
    *@apiDeprecated text
    */
  • @apiIgnore [hint]

    注:忽略的接口[hint]为忽略的原因,可选

    1
    2
    3
    /**
    *@apiIgnore hint
    */
  • @apiPermission name

    注:api的权限名

    1
    2
    3
    /**
    *@apiPermission admin
    */
  • @apiParam [(group)] [{type}] [field=defaultValue] [description]

    注:接口参数
    {type}包括:{String} 字符串,{Boolean}布尔值, {Number}数字, {Object}对象, {String[]}字符串数组
    [field] 可选参数field
    field 必选参数 field
    =’string’ 参数默认值
    {type{size}} 代表字符长度{String{6-12}}
    [description] 字段描述

    1
    2
    3
    4
    5
    6
    7
    8
    9
    10
    11
    /**
    * @api {post} /user/
    * @apiParam {String} [firstname] Optional Firstname of the User.
    * @apiParam {String} lastname Mandatory Lastname.
    * @apiParam {String} country="DE" Mandatory with default value "DE".
    * @apiParam {Number} [age=18] Optional Age with default 18.
    *
    * @apiParam (Login) {String} pass Only logged in users can post this.
    * In generated documentation a separate
    * "Login" Block will be generated.
    */
  • @apiSuccess [(group)] [{type}] field [description]

    注:接口返回值显示
    {type}包括:{String} 字符串,{Boolean}布尔值, {Number}数字, {Object}对象, {String[]}字符串数组
    field 返回字段名
    [description] 字段描述

    1
    2
    3
    4
    5
    /**
    * @api {get} /user/:id
    * @apiSuccess (200) {String} firstname Firstname of the User.
    * @apiSuccess (200) {String} lastname Lastname of the User.
    */
  • @apiSuccessExample [{type}] [title] example

    注:接口返回值显示
    {type}包括:{json}
    title 返回说明:
    [example] 返回例子

    1
    2
    3
    4
    5
    6
    7
    8
    9
    /**
    * @api {get} /user/:id
    * @apiSuccessExample {json} Success-Response:
    * HTTP/1.1 200 OK
    * {
    * "firstname": "John",
    * "lastname": "Doe"
    * }
    */

5.版本比较

要保留两份,后新的版本的时候。保留原来的版本说明,复制修改为新的版本,另外修改新的版本号

1
2
3
4
5
6
7
8
9
10
11
12
13
14
15
16
17
18
19
20
21
22
23
24
25
26
27
28
29
30
31
32
33
34
35
36
37
38
39
40
41
42
43
44
45
46
47
48
49
50
51
52
53
54
55
56
57
58
59
60
61
62
63
64
65
66
67
68
69
70
71
72
73
74
75
76
77
78
79
80
81
82
83
/**
* @api {post} /index/index 首页接口
* @apiVersion 1.1.0
* @apiDescription 首页获取数据
* @apiName index
* @apiGroup Index
*
* @apiUse token
* @apiParam {string} [page=1] 页数
* @apiParam {string} [limit=10] 每页条数
* @apiParam {string} [name] 搜索名
*
* @apiUse tokenError
*
* @apiSuccessExample {json} 成功返回:
* {
"status": "1",
"code": "200",
"message": "成功",
"data": {
"noticeList": [
{
"pic": "http://xblj.oss-cn-hangzhou.aliyuncs.com/khw_server/user/1/credential/1498805411211761.png",
"url": "http://www.local.com/xblj/khw/server/api/web/index.php/page/notice?id=6",
"id": "6"
}
],
"courseList": [
{
"type_name": "客运",
"type": "1",
"course_name": "测试",
"price": "20.00",
"cover_pic": "http://xblj.oss-cn-hangzhou.aliyuncs.com/khw_server/user/1/credential/1498805411211761.png",
"buy_times": "10",
"course_id": "1"
}
]
}
}
*/

/**
* @api {post} /index/index 首页接口
* @apiVersion 1.2.0
* @apiDescription 首页获取数据
* @apiName index
* @apiGroup Index
*
* @apiUse token
* @apiParam {string} [page=1] 页数
* @apiParam {string} [limit=10] 每页条数
*
* @apiUse tokenError
*
*
* @apiSuccessExample {json} 成功返回:
* {
"status": "1",
"code": "200",
"message": "成功",
"data": {
"noticeList": [
{
"pic": "http://xblj.oss-cn-hangzhou.aliyuncs.com/khw_server/user/1/credential/1498805411211761.png",
"url": "http://www.local.com/xblj/khw/server/api/web/index.php/page/notice?id=6",
"id": "6"
}
],
"courseList": [
{
"type_name": "客运",
"type": "1",
"course_name": "测试",
"price": "20.00",
"cover_pic": "http://xblj.oss-cn-hangzhou.aliyuncs.com/khw_server/user/1/credential/1498805411211761.png",
"buy_times": "10",
"course_id": "1"
}
]
}
}
*/

mysql用户远程登录

发表于 2019-06-04 | 分类于 mysql | 评论数:

方法一

1
2
3
4
5
6
7
8
9
10
11
command 1:

grant (all privileges)
on database.table
to username@'ip'
idenitfied by 'password'
with grant option;

command 2:

flush privileges;
阅读全文 »

array_merge() 函数详解

发表于 2019-06-04 | 分类于 php | 评论数:

关联数组

1
2
3
4
5
6
7
8
9
10
11
12
13
14
15
 $a = [
'a'=>'abc',
'b'=>'ccc',
'c'=>'ddd'
];

$b = [
'a'=>'122',
'b'=>'333',
'd'=>'ddd'
];

$c = array_merge($a,$b);

var_dump($c);

很显然,关联数组会根据键名合并,若数组键名相同,第二个数组合并第一个,返回如下

阅读全文 »

php 设计模式(单例模式)

发表于 2019-06-04 | 更新于 2019-06-17 | 分类于 php | 评论数:

生成对象

单例模式

- 系统中只能有一个对象
- 该对象可以被所有其他对象调用
- 该对象不能存储到可改变的全局变量中
阅读全文 »

go操作mysql数据库

发表于 2018-08-27 | 更新于 2019-06-04 | 分类于 go | 评论数:

go操作mysql数据库

示例数据库结构

数据库test,用户表userinfo,关联用户信息表userdetail

1
2
3
4
5
6
7
8
9
10
11
12
13
14
CREATE TABLE `userinfo` (
`uid` INT(10) NOT NULL AUTO_INCREMENT,
`username` VARCHAR(64) NULL DEFAULT NULL,
`department` VARCHAR(64) NULL DEFAULT NULL,
`created` DATE NULL DEFAULT NULL,
PRIMARY KEY (`uid`)
);

CREATE TABLE `userdetail` (
`uid` INT(10) NOT NULL DEFAULT '0',
`intro` TEXT NULL,
`profile` TEXT NULL,
PRIMARY KEY (`uid`)
)

操作数据库

1 引入库文件
1
2
3
4
import (
"database/sql"
_ "github.com/go-sql-driver/mysql"
)
2 连接数据库
1
2
3
4
5
6
7
8
9
//host 数据库地址
//port mysql端口
//database 连接的数据库
db,err := sql.open("mysql","用户名:密码@tcp(host:port)/database")
if err != nil {
panic(err)
}
//关闭数据库
defer db.Close()
3 插入数据
1
2
3
4
5
6
//插入语句预处理
stmt,err := db.Prepare("INSERT userinfo set username=?,department=?,created_at=?")
//插入数据
res,err := stmt.Exec("test","销售部门","2018-05-10")
//获取上次插入的id
id,err := res.lastInsertId()

4 查询数据

1
2
3
4
5
6
7
8
9
10
11
12
13
14
15
//获取数据库的所有字段
res,err := db.Query("select * from userinfo")
res.Columns()

//获取单挑数据
res := db.QueryRow("select * from userinfo")
res.scan(&uid,&username,&department,&created_at)

//获取多条数据结果
stmt,err := db.Prepare("select * from userinfo where uid=?")
res,err := stmt.Query(1)
//循环获取单挑数据
for res.Next(){
res.scan(&uid,&username,&department,&created_at)
}

5 修改数据

1
2
3
4
stmt,_ := db.Prepare("update userinfo set username=? where id = ?")
res,_ := stmt.Exec("test",1)
//受影响的行数
res.RowsAffected()

6 删除数据

1
2
3
stmt,_ := db.Prepare("Delete from userinfo where uid=?")
res,_ := stmt.Exec(1)
res.RowsAffected()

go语言学习之并发

发表于 2018-08-11 | 更新于 2019-06-04 | 分类于 go | 评论数:

go 并发

goroutine

  1. goroutine是Go并行设计的核心。goroutine说到底其实就是协程,但是它比线程更小
  2. Go语言内部帮你实现了这些goroutine之间的内存共享
  3. 执行goroutine只需极少的栈内存(大概是4~5KB),当然会根据相应的数据伸缩。也正因为如此,可同时运行成千上万个并发任务
  4. goroutine比thread更易用、更高效、更轻便
  5. goroutine是通过Go的runtime管理的一个线程管理器。goroutine通过go关键字实现了,其实就是一个普通的函数。
    1
    go hello(a,b,c)

channels

定义一个channel时,也需要定义发送到channel的值的类型,
注意:必须使用make 创建channel
channel通过操作符<-来接收和发送数据

1
2
3
4
5
6
7
var c = make(chan int)
var b = make(chan string)
var c = make(chan interface{})
//存入数据
c <- 'abc'
//取出数据
value := <-c

默认情况下,channel接收和发送数据都是阻塞的

buffered channels (带缓冲的channels)

1
2
3
ch := make(chan type,value)
//创建带有4个缓冲的线程
ch := make(chan type, 4)

注意:

  1. range (使用range方法读取channels里面的数据)
  2. close() 关闭channel,应该在生产者
1
2
3
4
5
6
7
8
9
10
11
12
13
14
15
16
17
18
19
20
21
22
package main

import (
"fmt"
)

func fibonacci(n int, c chan int) {
x, y := 1, 1
for i := 0; i < n; i++ {
c <- x
x, y = y, x + y
}
close(c)
}

func main() {
c := make(chan int, 10)
go fibonacci(cap(c), c)
for i := range c {
fmt.Println(i)
}
}

select (switch切换channel)

select默认是阻塞的,只有当监听的channel中有发送或接收可以进行时才会运行,当多个channel都准备好的时候,select是随机的选择一个执行的。

1
2
3
4
5
6
7
8
9
10
11
12
13
14
15
16
17
18
19
20
21
22
23
24
25
26
27
28
package main

import "fmt"

func fibonacci(c, quit chan int) {
x, y := 1, 1
for {
select {
case c <- x:
x, y = y, x + y
case <-quit:
fmt.Println("quit")
return
}
}
}

func main() {
c := make(chan int)
quit := make(chan int)
go func() {
for i := 0; i < 10; i++ {
fmt.Println(<-c)
}
quit <- 0
}()
fibonacci(c, quit)
}

select设置超时

1
2
3
4
5
6
7
8
9
10
11
12
13
14
15
16
17
func main() {
c := make(chan int)
o := make(chan bool)
go func() {
for {
select {
case v := <- c:
println(v)
case <- time.After(5 * time.Second):
println("timeout")
o <- true
break
}
}
}()
<- o
}

runtime gotoutine

runtime包中有几个处理goroutine的函数:
  • Goexit

退出当前执行的goroutine,但是defer函数还会继续调用

  • Gosched

让出当前goroutine的执行权限,调度器安排其他等待的任务运行,并在下次某个时候从该位置恢复执行。

  • NumCPU

返回 CPU 核数量

  • NumGoroutine

返回正在执行和排队的任务总数

  • GOMAXPROCS

用来设置可以并行计算的CPU核数的最大值,并返回之前的值。
123…5
ZYJ

ZYJ

代码改变世界

47 日志
16 分类
30 标签
RSS
GitHub E-Mail
友情链接
  • 风雪之隅
  • 阮一峰的网络日志
0%
© 2019 ZYJ
由 Hexo 强力驱动 v3.8.0
|
主题 – NexT.Gemini v6.7.0